그래프큐엘 입력창 연동 실습
입력창에 입력을 하면 그걸 최종 mutation 에 보내는 것
export default function GraphqlMutationPage() {
  const [writer, setWriter] = useState("");
  const [title, setTitle] = useState("");
  const [contents, setContents] = useState("");

  const [나의함수] = useMutation(나의그래프큐엘세팅);

  const onClickSubmit = async () => {
    const result = await 나의함수({
      variables: {
        writer: writer, // writer state 를 넣음
        title: title, // title state 를 넣음
        contents: contents, // contents state 를 넣음
      },
    });
    console.log(result);
  };

  // 작성자 입력값
  const onChangeWriter = (e) => {
    setWriter(e.target.value);
  };
  // 제목 입력값
  const onChangeTitle = (e) => {
    setTitle(e.target.value);
  };
  // 내용 입력값
  const onChangeContents = (e) => {
    setContents(e.target.value);
  };

  return (
    <div>
      작성자 : <input type="text" onChange={onChangeWriter} />
      제목 : <input type="text" onChange={onChangeTitle} />
      내용 : <input type="text" onChange={onChangeContents} />
      <button onClick={onClickSubmit}>GRAPHQL-API 요청하기</button>
    </div>
  );
}
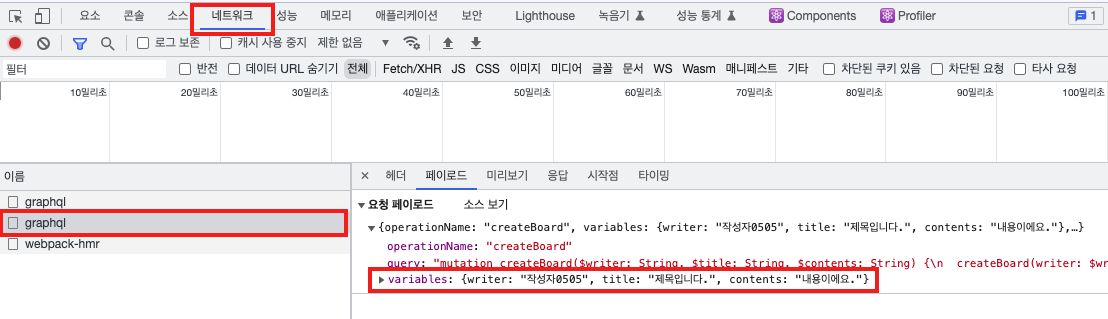
데이터가 잘 들어갔는지 확인하려면
네트워크탭 -> graphql -> Payload(페이로드) 부분에 데이터가 정상적으로 들어간걸 확인할 수 있다.
'비공개 > 강의 간단 정리(추후 복습하면서 수정)' 카테고리의 다른 글
| [Section05-01] static-routing (0) | 2023.05.05 |
|---|---|
| [Section04-05] graphql-mutation-product (0) | 2023.05.05 |
| [Section04-03] graphql-mutation-args (0) | 2023.05.05 |
| [Section04-02] graphql-mutation (& 에러를 해결하는 방법) (0) | 2023.05.05 |
| [Section04] GraphQL 세팅 (0) | 2023.05.05 |